How to Modify KnownHost DNS?

Through this guide, you can easily modify Knownhost DNS. Before managing its DNS you must know about the term what is DNS and how it works. This tutorial will help you in managing your website DNS if you own the services of Knownhost. If you want to modify DNS then you can reshape it Cpanel & WHM.
So, move on and know How to modify KnownHost DNS with an easy step tutorial. Before a start let’s start with What is DNS.
What is DNS?
The earlier time when a user wants to browse a website they need to use an IP address browser. It tough to remember all the IP addresses. The reason behind is that the computer is only able to understand number. But this becomes a trouble for all the users. So, in 1980 Paul Mockapetris came up with a system that connects your IP Address with the domain name automatically.

And through this DNS was born. This system is still working on the modern internet and helps all the users to connect a domain name with its IP address.
DNS Stands for Domain Name System. It automatically connects URLs with their IP address. With the help of DNS, it becomes possible to use words instead of a combination of numbers in a browser. Through this, it becomes easy for all the users to browse a website and send mail to them directly. Now the users no need to worry about how to remember a domain name. A user can easily remember a domain name when they are browsing and become easy to browse the desired site anytime.
I hope you will get to know about what is DNS now we will move ahead to modify KnownHost DNS.
How to Modify KnownHost DNS?
Let’s begin with the easy tutorial that will help you in changing your DNS if you are using the services of KnownHost Web Hosting. Here are two methods that will help you to reshape your DNS. You can modify it with the help of WHM and Cpanel. First with start with Cpanel and then move towards to WHM process.
Modify KnownHost DNS through Cpanel

Control panel is the easiest platform to operate a website so let’s start with the Cpanel to change DNS. Follow the steps and change them now if you want to.
- Log in to your Cpanel. Enter your Username and Passwords.

- Once you logged in then go to the “Zone Editor” that is located under Domain Category.

Under this area, you can add individual Records fr Quick Access- A, CNAME, and MX Records.
- If you are going to change it then click on the last one option “Manage” for changing.
Once you choose his area then click on the “Add Record” Little Arrow mentions the right side of the button.
- Click on the button and choose the “Add MX Record. When you choose any of the Records ten it’s going to add a new value to its top list.

- Fill in all the details and click on the Add Record Button.

If you want to make changes with the other records then you can go with the same process. If you are facing any kind of trouble while performing this task then you can connect with the KnownHost Customer Support Team.
Modify DNS with WHM

Let’s start the process of Modify KnownHost DNS with the help of WHM. Follow the tutorial and change your KnownHost DNS. The process of WHM is too easy for all the users. In this WHM you will get to know about two different methods. Both are easy to operate methods so go with the desired one.
- First login to the WHM enter your username and password and click the login button.

- Choose the classic theme option from the right side upper corner.

- Choose the DNS Functions Icon
- Then Choose Edit DNS Zone

This one is the easiest way to change KnownHost DNS. Let’s move towards the second method with the default theme option.
- Log in to your WHM Account
- Choose the Default theme option from the right side upper corner
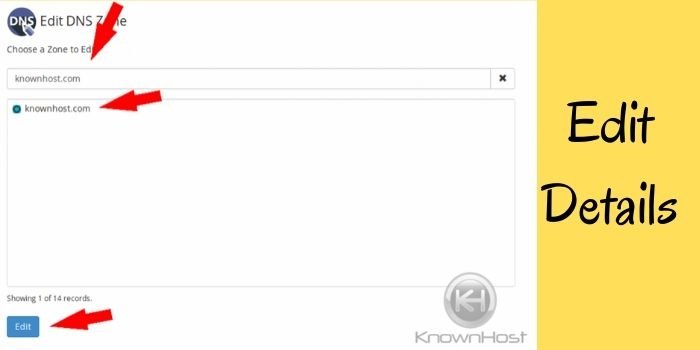
- Then move towards the left side and click on the Edit DNS Zone option.

- You will see a page edit all the domain-related details and click on the edit button.

- On the next page, you will see a bunch of different servers. Now you have to select the best one.

| MX Server Address | Priority |
| ASPMX.L.GOOGLE.COM. | 1 |
| ALT1.ASPMX.L.GOOGLE.COM. | 5 |
| ALT2.ASPMX.L.GOOGLE.COM. | 5 |
| ALT3.ASPMX.L.GOOGLE.COM. | 10 |
| ALT4.ASPMX.L.GOOGLE.COM. | 10 |
- First, you need to modify the default MX Record.

- Then go to the bottom section and ad further details and click on the Save button.

With the help of the above-mentioned information, you can easily modify KnownHost DNS. The steps are easy to manage so go with the above-mentioned tutorial.


